An Exceptional Learning Tool: The Flowchart
Constructing learning using a powerful learning tool, to engage and empower young children.
When I first encountered the orthographic flowcharts I found them to be an inspirational tool to use with young children. They are highly interactive, systematic and challenging.
By manipulating the physical pieces of the flowchart, the children are able to develop a deeper understanding of what is required from the questions and actions. Using the kinaesthetic memory ensures learning is internalised, ensuring deep, long term understanding of the spelling pattern or convention. I love the fact that it mirrors what the brain does, helping to internalise important orthographic processes.
With young children, I generally introduce the flowchart once the children have gained some understanding of the spelling convention or pattern currently being studied. However, it can be introduced at any stage during the learning journey.
Here is a sequence of possible steps for introducing the flowchart process.
As with all structured word inquiry we would start with an investigative question to lead an inquiry about an important suffixing convention: such as, suffixing with the final single, silent <e>; when suffixing forces doubling; plural suffixes.
An important part of the initial learning journey is providing opportunities for all students to express their thinking.
Some children already have the necessary skills to express themselves effectively while others will need support to express themselves in the written form.
Once the students have experienced working with some basic suffixing conventions they begin to refine their language, expressing their hypotheses with greater clarity and more accurate terminology.
After discussion of the investigative question and recording of hypotheses, the students participate in a variety of collaborative and independent activities to critically examine the orthographic pattern or convention that is being investigated. It is usually at this stage in the journey that I introduce the flowchart.
Investigating the purpose and process of a flowchart:
The flowchart is cut into large pieces, with the questions/decision boxes on diamond shaped card, actions on rectangular shape cards and a set of linking arrows. The children discuss the different components and meaning of the flowchart. Some children have likened it to a 'river flowing' or 'pathway through a forest'...with the arrows linking the pathways.
Creating the flowchart, working out the puzzle pieces:
This part of the learning journey is a whole group, collaborative activity. I want to model good learning, reinforce accurate vocabulary, restate the purpose of the flowchart, consolidate the meaning of the questions/actions and guide the students where necessary. Constructing a flowchart that flows effectively can be challenging for both younger and older children and so modelling how to link the arrows is very helpful for children.
 |
Suffixing with the final, single, silent <e> is one of the simplest flowcharts to construct and I generally start with this critical suffixing convention with all age groups. |
 |
The linking arrows are purposefully left blank so the students can decide whether it will be a 'yes' or 'no' arrow. |

The emerging flowchart puzzle is placed in a learning space so the children have opportunities to manipulate the pieces, as
indicated in these images.

It is critical that the children follow the flowchart physically, following the pathway of the arrows with a finger or hand, simultaneously reading each section. This kinaesthetic action ensures the flowchart will be effectively internalised.
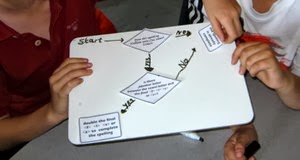
Checking and testing for accuracy: Once the large flowchart has been created the students choose known words or word sums to check the organisation of the flowchart and make any necessary adjustments to the flowchart. The children use small whiteboards to create appropriate word sums checking for any changes with the completed flowchart. Often the children will notice they have placed the yes and no arrows incorrectly. At this stage, the flowchart is not adhered to any surface so it can be continually manipulated and changed.


 |
| The students are checking the flowchart by constructing known word sums, deciding whether to replace or retain the final, single, silent <e>. |
Problem solving:
Once the large flowchart has been created and checked the students build their own individual flowcharts. The children create an individual flowchart on a small whiteboard, so they can manipulate and change where necessary. When the children have checked their flowchart with known word sums, a final copy is created.
 |
| The children need to read each question and action to make informed decisions about the placement of the pieces. |
 |
| Using problem solving strategies to construct the flowchart for the final <f> or <ff>. |
 |
| The students are working with a partner to complete an independent flowchart, helping and supporting each other. |
 |
| Choosing <k> or <ck> in the final position of a base. The students highlight new vocabulary introduced in the flowchart. |
 |
| While the students independently construct their own flowcharts I work with small groups of children to support their learning and understanding. |
Internalising the process:
The children build word sums analysing suffixing changes using the flowchart to support their decision making.
 |
| A completed flowchart with the linking arrows for the decision boxes. Doubling the final letter for monosyllables. |
 |
| Suffixing with the final, single, silent <e>. By building and analysing word sums children begin to internalise this critical suffixing convention. |
 |
| Students collaborating and analysing a completed flowchart. |
To reinforce and consolidate learning the students can take home the flowchart pieces and recreate it with their family, explaining the suffixing pattern. A great homework project that involves the family working together.
My journey...new understanding:
NB Since posting this orthographic investigation, I now use the more linguistically accurate terminology for the single, final non-syllabic <e>. Understanding the functions of the single, final non-syllabic <e> can be viewed on this VIDEO clip on the Real Spelling site.


Comments
Post a Comment